Braemar
Module used to integrate with a Braemar AC unit. The iZone AC unit module (C325#) connects to the CPU module (C225) to enable communication with a ducted AC unit.
Braemar Ducted Series
Compatibility
| Series | Indoor | Outdoor | AC Module |
|---|---|---|---|
| Single Phase 7kW | SDHV07D1S | SCHV07D1S | C325B |
| Single Phase 10kW | SDHV10D1S | SCHV10D1S | C325B |
| Single Phase 12kW | SDHV12D1S | SCHV12D1S | C325B |
| Single Phase 14kW | SDHV14D1S | SCHV14D1S | C325B |
| Single Phase 16kW | SDHV16D1S | SCHV16D1S | C325B |
| Invertair™ Series 12kw | KCHV125D1B | KCHV125D1B | C325B |
note
If your unit's model number is not listed above, contact supportdesk@izone.com.au to confirm compatibility.
Connection
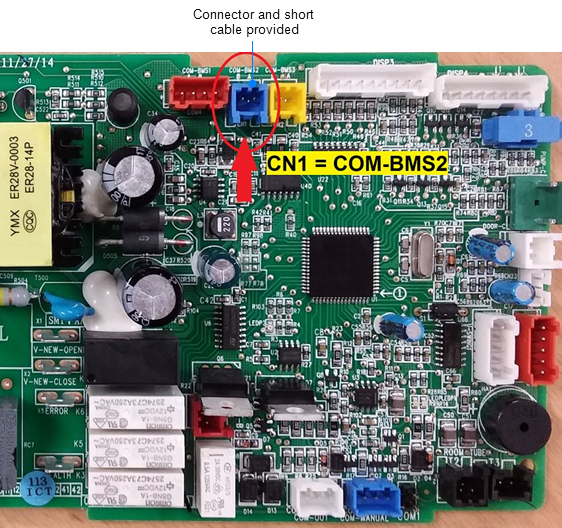
- Indoor fan coil unit PCB: Note connector CN1
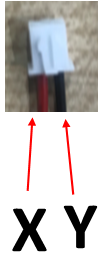
- Connector and short cable provided: Insert the connector and short cable (see image below) into the connector CN1. Note the correct polarity for X & Y. Polarity is critical
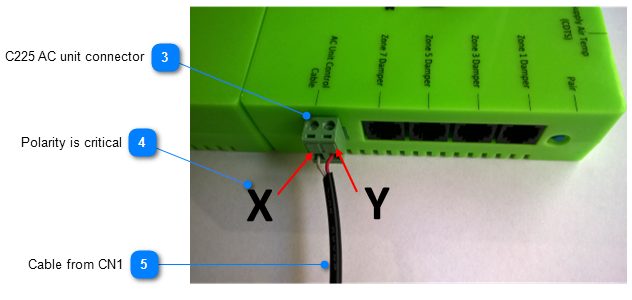
- C225 AC unit connector: Connect AC unit cable from fan coil to C225 as indicated
- Polarity is critical: Make sure it is wired in accordance with these instructions on both the CN1 connector on the fan coil PCB and the C225 cable connector
- Cable from CN1: Connect a shielded, 2 core, twisted pair cable to the connector and short cable provided
Notes
Can only use return air as the controlling sensor.
Requires Braemar proprietary controller for setup.
Setup using XK60 or XK117
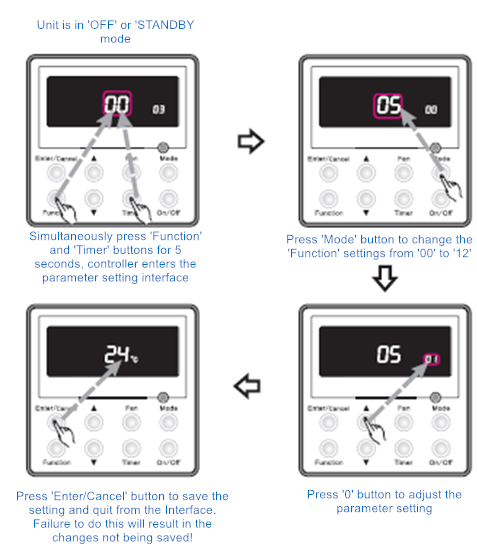
- Unit in “OFF” state
- Press “FUNCTION” & “TIMER” buttons for 5 seconds
- Press “MODE” button to change “Function display” number
- Press ▲ or ▼ button to change “Parameter display” number
- Press “ENTER/CANCEL” to save
- Setup the following parameters.
| Function Display | Set Parameter To | Parameter Description |
|---|---|---|
| 0 | 01 | Sensor at return air for all modes |
| 10 | 01 | iZone control setting |
| 11 | 01–09 | Adjust static pressure. See next step. |
- Select from static pressure parameters
| Parameter | Static Pressure (Pa) | High Speed | Low Speed |
|---|---|---|---|
| 01 | 10 | 5 | 1 |
| 02 | 20 | 6 | 2 |
| 03 | 30 | 7 | 3 |
| 04 | 40 | 8 | 4 |
| 05 (Default) | 50 | 9 | 5 |
| 06 | 75 | 10 | 6 |
| 07 | 100 | 11 | 7 |
| 08 | 150 | 12 | 8 |
| 09 | 200 | 13 | 9 |
- Cycle the power to the AC unit.
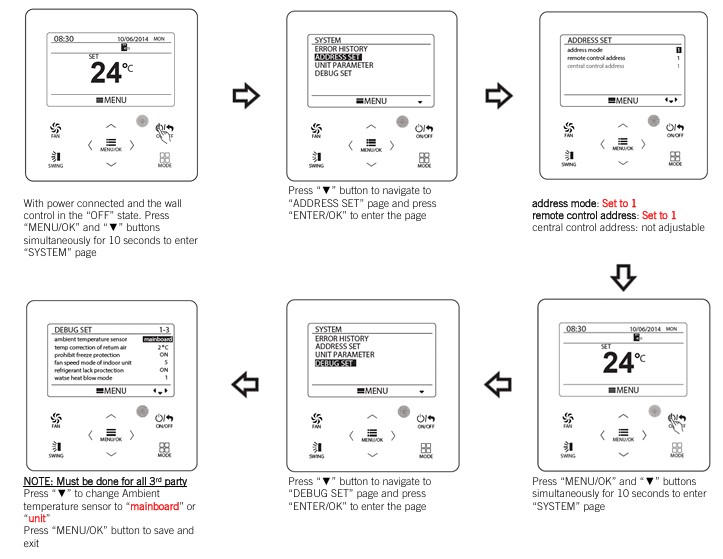
Setup using XK75
- Unit in “OFF” state
- Press “MENU/OK” & ▼ buttons for 10 seconds
- Navigate to "ADDRESS SET"
- Set address mode to 1, remote control address to 1 and return
- Navigate to "DEBUG SET"
- Set ambient temperature sensor to "unit"
- Cycle the power to the AC unit
KDHA R32 SPLIT SERIES DUCTED
Compatibility
| Series | Indoor | Outdoor | AC Module |
|---|---|---|---|
| SINGLE PHASE / 7kW - 16kW | KDHA070D1S | KCHA070D1B | C325G3 |
| SINGLE PHASE / 7kW - 16kW | KDHA100D1S | KCHA100D1B | C325G3 |
| SINGLE PHASE / 7kW - 16kW | KDHA125D1S | KCHA125D1B | C325G3 |
| SINGLE PHASE / 7kW - 16kW | KDHA140D1S | KCHA140D1B | C325G3 |
| SINGLE PHASE / 7kW - 16kW | KDHA160D1S | KCHA160D1B | C325G3 |
note
If your unit's model number is not listed above, contact supportdesk@izone.com.au to confirm compatibility.
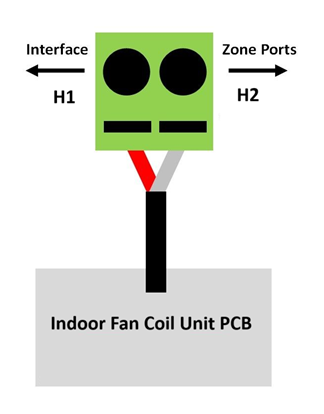
Connection
- Polarity IS critical.
- Connect a 2 core, twisted pair control cable from the C225 / C325G3 to H1/H2 in the fan coil unit.
Notes
Requires Braemar proprietary controller for setup.
Setup using XK75
- Unit in “OFF” state
- Press “MENU/OK” & ▼ buttons for 10 seconds
- Navigate to "ADDRESS SET"
- Set address mode to 1, remote control address to 1 and return
- Navigate to "DEBUG SET"
- Set ambient temperature sensor to "unit"
- Cycle the power to the AC unit
(GUD71~160PHS1/C-S introduced late 2024)
Dominator V2 (KGHV… series)
Compatibility
| Series | Indoor | Outdoor | AC Module |
|---|---|---|---|
| Dominator v2 (KGHV… series) | C325BDM |
note
If your unit's model number is not listed above, contact supportdesk@izone.com.au to confirm compatibility.
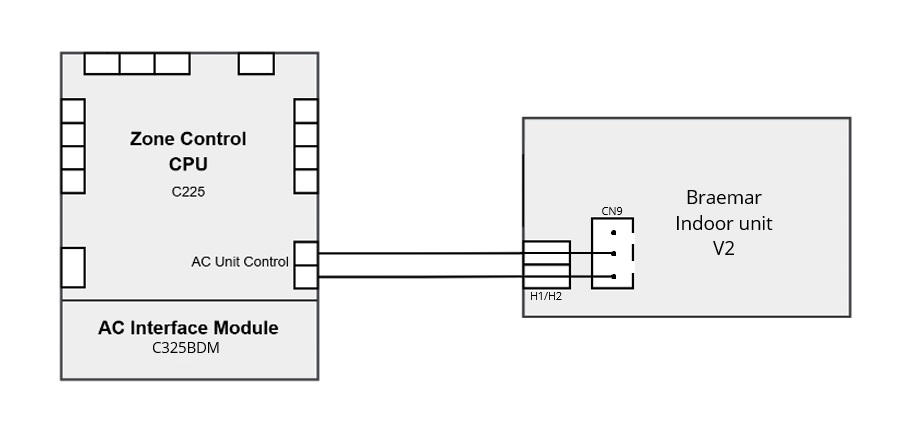
Connection
- Connect a 2 core, twisted pair control cable from C225 / C325BDM to H1/H2 in the fan coil unit
- Polarity IS critical
Notes
None
Firmware and Updates
C325B
- No firmware
C325BDM
C325BDM 1.0 - Jun 2026
- Initial release (requires C225 v3.77, CCTSL v2.36, NOVA v3.1.5)
C325G3
- See C325G3 firmware details.