Nano Operation Guide
AC system summary
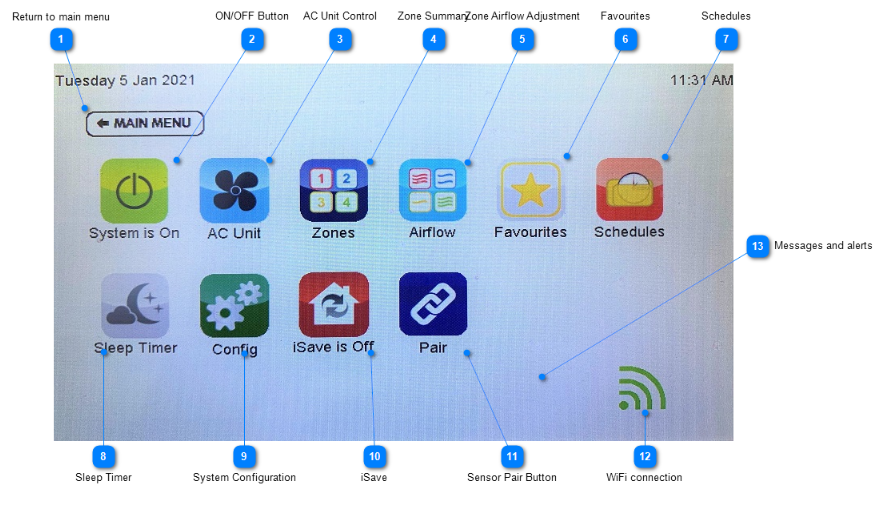
- Return to Main Menu
- ON/OFF Button: The AC unit can be turned on and off by pressing the On/Off button. When on, the button will be green and the text below the button will read "System is On". When off, the button will turn red and the text below will read "System is Off" Please note that all AC units incorporate built-in timers and delays, so it may take several minutes after turning a unit on or off before you notice any change
- AC Unit Control: Press the AC Unit button to access the AC Unit Control screen. Here you can change modes, fan speeds, set points, etc.
- Zone Summary: Press the Zones button to access the Zone Summary. For an explanation of the different zone configurations, follow this link
- Zone Airflow Adjustment: Press the Zone Airflow button to access the Airflow Summary
- Favourites: Press the Favourites button to access the Favourites Summary
- Schedules: Press the Schedules button to access the Schedules Summary
- Sleep Timer: Press the Sleep Timer button to toggle different durations, from half an hour to 12 hours. When set, the AC system will run for the selected period and then turn off automatically. If you require a more sophisticated schedule, go to Schedules
- System Configuration: Press the Config button to access the system configuration settings
- iSave: If fitted, the iSave system can be manually turned on and off by pressing the iSave button. When turned on, the AC unit will automatically switch to Vent mode, the outside air dampers will open fully, and the return air dampers will close fully. The zones will control as per normal. When turned off, the AC unit will automatically return to its previous mode, the outside air dampers will close fully, and the return air dampers will open fully
- Sensor Pair Button: Use this pair button to pair devices to the iZone Aircon system, such as zone sensors and the bridge
- Wi-Fi Connection: The Wi-Fi connection symbol only appears if a bridge is fitted. When first paired to the system, the symbol will be grey. Once connected to a Wi-Fi modem/router, the symbol will change to green
- Messages and Alerts: Messages and alerts display in a box here. Maintenance messages, such as a filter clean reminder, can be cleared by pressing the message several times Critical messages, such as an AC unit fault code, will remain on screen until the fault is rectified
AC unit control
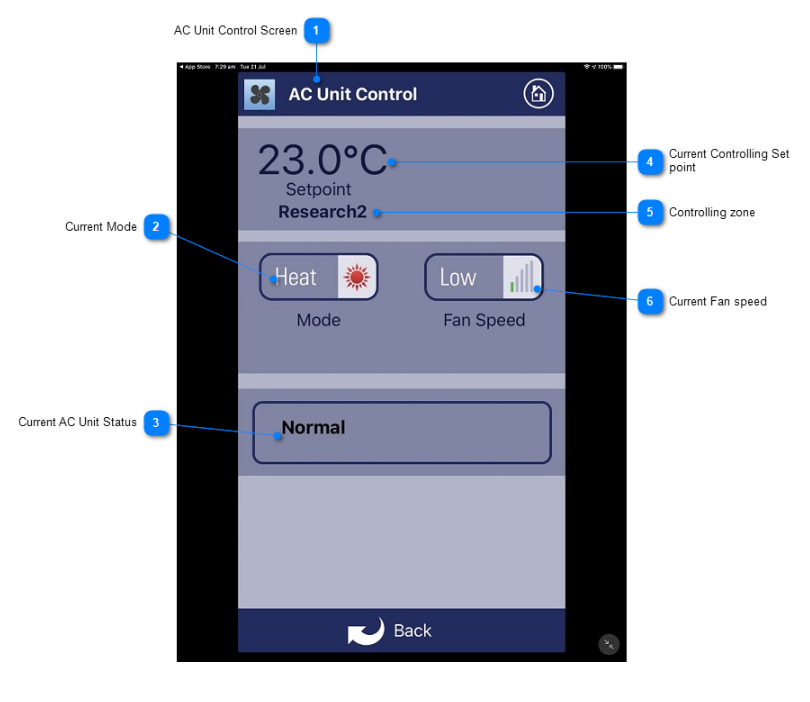
- AC Unit Control Screen: This is the AC Unit Control screen, accessed via the AC System Summary
- Current Mode: The current AC mode. Press the button to change it
- Current AC Unit Status: The current AC unit status is described here. If a fault occurs with the AC unit, it should be displayed here
- Current Controlling Set Point: The current controlling set point is shown here. This view differs depending on how the AC unit's controlling sensor is configured. In this example, the AC unit is being controlled from "Zones", and the zone currently furthest from set point is "Research2"
- Controlling Zone: The name of the zone currently controlling the AC unit
- Current Fan Speed: The current fan speed is displayed here. Press the fan button to change it
Zone summary
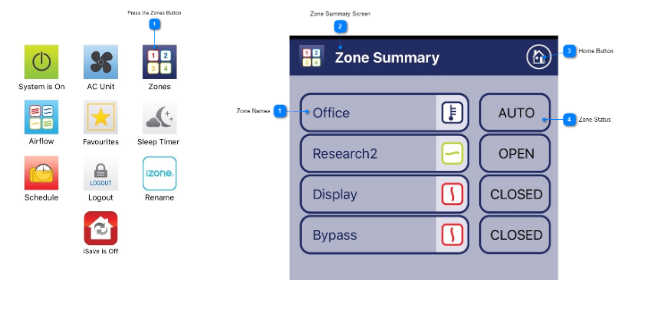
- Zone Names: The zone names are listed here
- Zone Summary Screen: This is the Zone Summary screen
- Home Button: Press the home or back button to return to the AC System Summary screen
- Zone Status: The zone status is shown as an icon with matching text. Press the text to open the zone details
Zone details
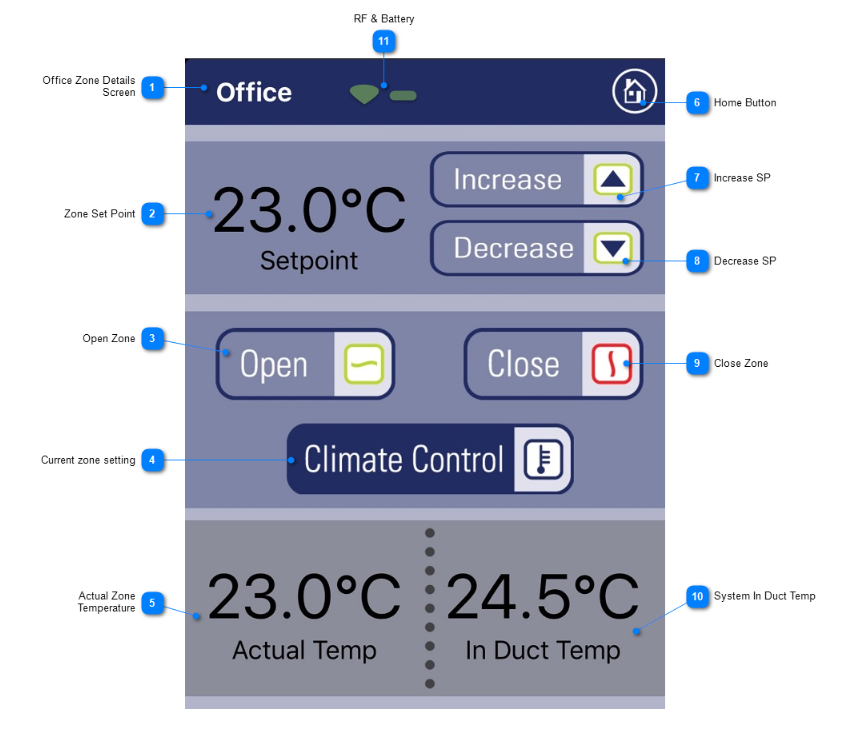
- Zone Details Screen: This is the Zone Details screen for a given zone (Office, in this example)
- Zone Set Point: This is the zone set point, if fitted with a temperature sensor
- Open Zone: To open the zone, touch the Open button
- Current Zone Setting: The background of the current zone setting is shown in dark blue. To set a zone to Climate (temperature) control, touch the Climate Control button
- Actual Zone Temperature: The current temperature in the zone is displayed here This depends on configuration settings and requires a temperature sensor to be installed in the zone
- Home Button: Press the home or back button to return to the Zone Summary screen
- Increase Set Point: To increase the zone set point, press the up arrow
- Decrease Set Point: To decrease the zone set point, press the down arrow
- Close Zone: To close the zone, touch the Close button
- System In-Duct Temp: The current system supply air temperature is displayed here This requires a CDTS temperature sensor to be installed in the main supply air duct
- RF & Battery: The signal strength and battery capacity of the wireless sensor are displayed here
Airflow summary
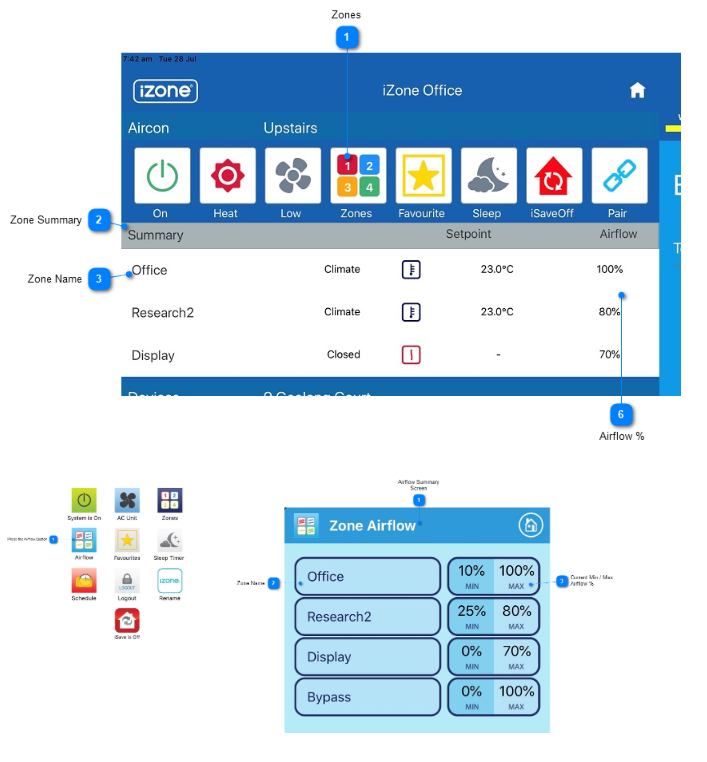
- Airflow Summary Screen: This is the Airflow Summary screen
- Zone Name: Zones are listed here
- Current Min / Max Airflow %: Current airflow settings are shown here. Press the Min/Max button to access the Airflow Details screen and edit the settings
Airflow details
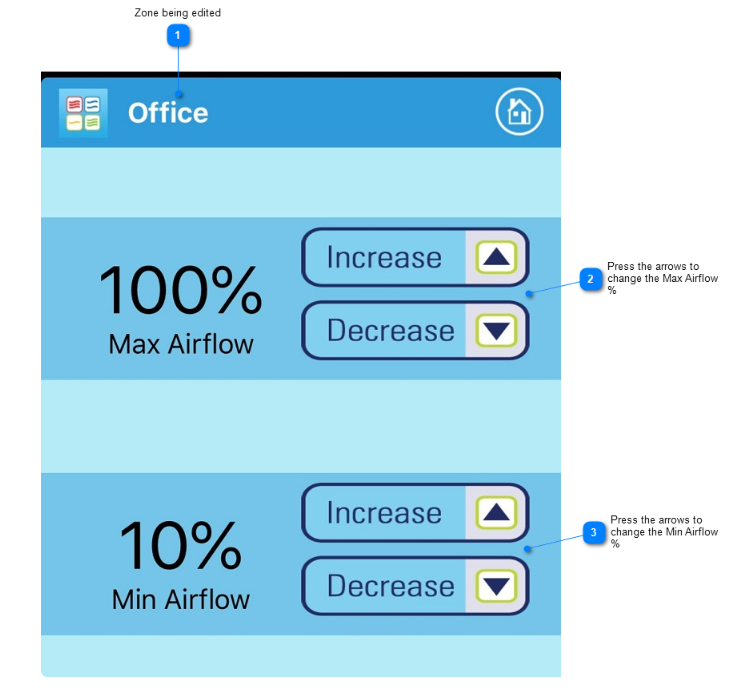
- Zone Being Edited: The zone name appears at the top of the Airflow Details screen
- Max Airflow % Adjustment: Use the up and down arrows to edit the maximum airflow % for this zone. If the arrows aren't visible, airflow adjustment may have been locked
- Min Airflow % Adjustment: Use the up and down arrows to edit the minimum airflow % for this zone. If the arrows aren't visible, airflow adjustment may have been locked
Favourites & scheduling summary
A favourite is a shortcut that allows the user to press a single button to simultaneously change zone status, set points, mode, and fan speed.
Once a favourite has been created, it can then be scheduled to start and stop at specific times during a 7-day week.
To configure a schedule, first create a favourite with the mode, fan speed, and zone settings you want to run when the schedule is active. Once the favourite has been created and tested, it can then be scheduled to start and/or stop at the required time.
Note: if schedules overlap, the following occurs — in the example below, Schedule A starts at 08:00 and stops early at 08:45 because it is overridden by Schedule B. Schedule B starts at 08:45 and stops early at 09:15 because it is overridden by Schedule C. Schedule C starts and stops at its scheduled times of 09:15–10:40.
Favourites summary
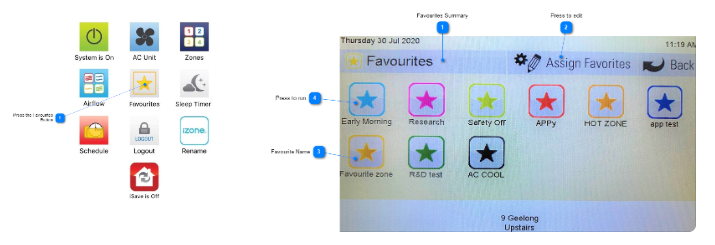
- Favourites Summary: This is the Favourites Summary, accessed from the AC System Summary
- Press to Edit: To edit a favourite, press "Assign Favourites" then press the favourite you want to edit. This opens the Favourite Details screen
- Favourite Name: The name of the favourite is shown here — it's useful to name it something that describes what it does
- Press to Run: To run a favourite, press the favourite button you want to run
Favourite details
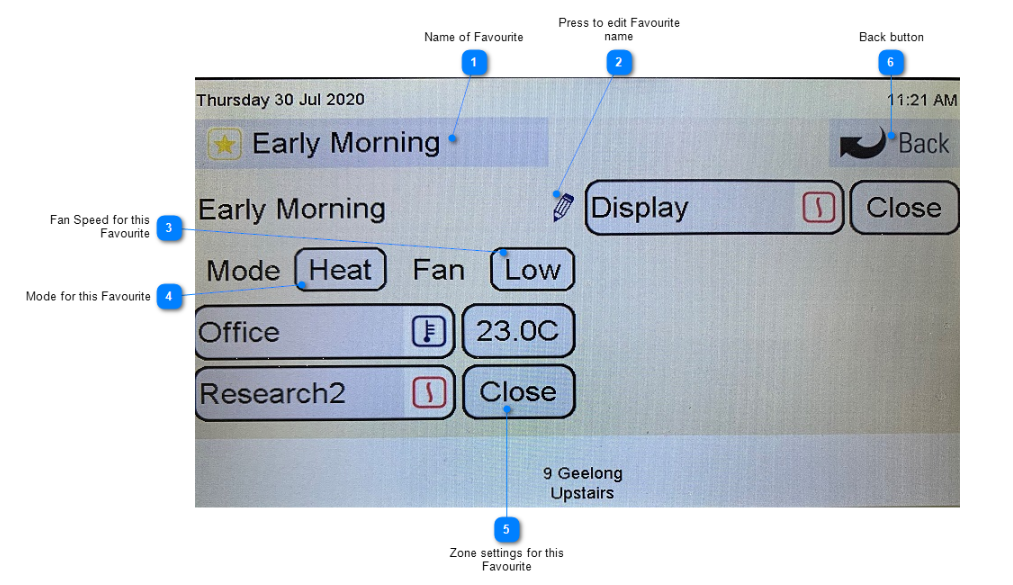
- Name of Favourite: This is the favourite you are viewing
- Press to Edit Name: Press the edit pencil to change the name of this favourite
- Fan Speed for this Favourite: This is the current fan speed for the favourite. Press this button to toggle through the different fan speeds If N/A is selected, iZone will not change the fan speed when this favourite is activated
- Mode for this Favourite: This is the current mode for the favourite. Press this button to toggle through the different modes If N/A is selected, iZone will not change the mode when this favourite is activated
- Zone Settings for this Favourite: These are the current zone settings for the favourite. Press a setting to toggle it from Closed > Open > Climate. To change a set point temperature on a climate-controlled zone, go to "Zones", change the set point, then return to Favourites and save
- Back Button: Press Back to return to the Favourites Summary
Scheduling summary
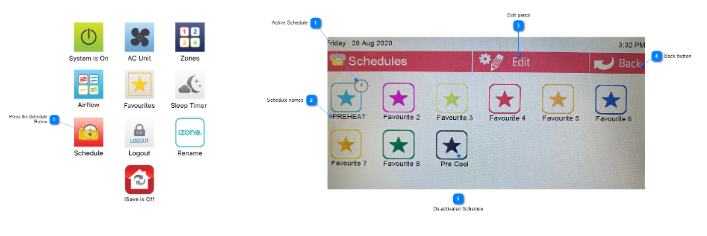
- Active Schedule: A clock icon indicates this schedule is active and will start/stop the favourite on the scheduled days/times. To deactivate, press the clock and it will disappear
- Schedule Names: This is the schedule name, taken from the name of the favourite being scheduled. To change it, go to Favourites and rename the favourite
- Edit Pencil: Press the edit pencil to open the details screen for a schedule
- Back Button: Press here to return to the main menu
- Deactivated Schedule: The absence of a clock icon in the top-right corner indicates this schedule is deactivated. Press the schedule button to activate it, and a small clock will appear
Scheduling details
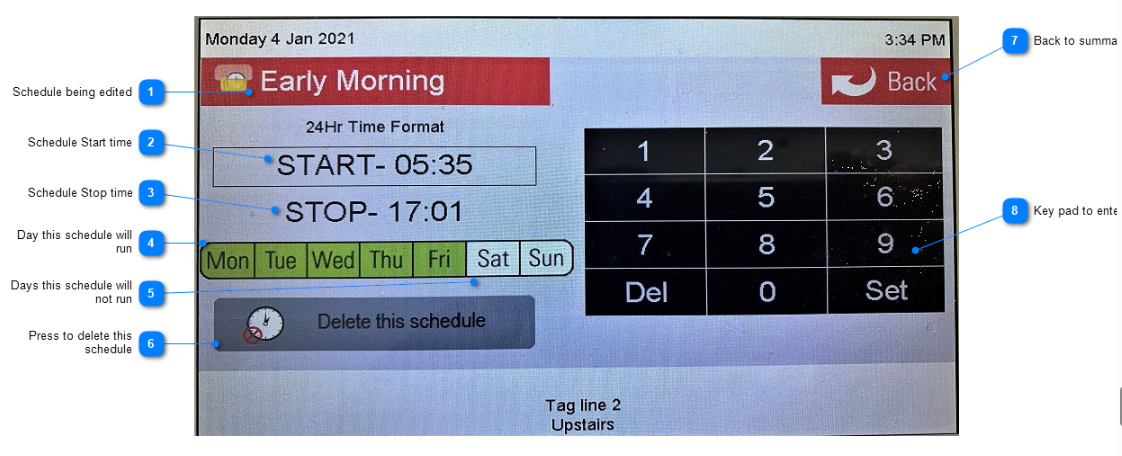
- Schedule Being Edited: This is the name of the schedule/favourite currently being changed
- Schedule Start Time: The time this schedule will start (24-hour format)
- Schedule Stop Time: The time this schedule will stop (24-hour format)
- Day this Schedule Will Run: Press the day you want this schedule to run. Active days are coloured green
- Days this Schedule Will Not Run: This schedule will not run on days shown in white. Press an active (green) day to change it to white
- Delete Schedule: Press this button to delete all settings for this schedule
- Back to Summary: Press to return to the Schedule Summary and save changes Don't forget to activate the schedule in the Schedule Summary if you want it to start running
- Keypad: Use the keypad to enter the start and stop times
Air quality summary
Air quality is measured using the following metrics:
- Indoor Air Quality (IAQ)
- Relative Humidity (RH %)
- Volatile Organic Compounds (VOC ppb)
- Carbon Dioxide (CO2 ppm)
Indoor air quality
For humans, indoor RH below 35% feels uncomfortably dry, and above 65% feels uncomfortably humid. The ideal range is between 50% and 60%.
For ease of understanding, iZone summarises overall IAQ from the worst reading of the VOC and CO2 sensors. The categories and levels are as follows:
VOC
| Rating | ppb | Description |
|---|---|---|
| Great | 0–60 | VOC levels are normal |
| Good | 61–200 | VOC levels are moderate. Opening windows/doors or running ventilation fans to increase outdoor air exchange will help reduce VOC levels |
| Fair | 201–2030 | VOC levels are elevated. Opening windows/doors or running ventilation fans to increase outdoor air exchange will help reduce VOC levels |
| Poor | above 2030 | VOC levels are high. Key sources include cigarette smoke, vehicle emissions, building renovations, solvents, household cleaning products, and pesticides. It's strongly recommended to open windows/doors or run ventilation fans to increase outdoor air exchange |
CO2
| Rating | ppm | Description |
|---|---|---|
| Great | 200–600 | CO2 levels are low and healthy |
| Good | 601–900 | CO2 levels are acceptable |
| Fair | 901–1400 | CO2 levels are high and may cause drowsiness. Opening windows/doors or running ventilation fans to increase outdoor air exchange will help reduce CO2 levels |
| Poor | above 1400 | CO2 levels are excessive; extended exposure may cause health issues. Opening windows/doors or running ventilation fans to increase outdoor air exchange will help reduce CO2 levels |
Outdoor air quality
Each Australian state and territory is responsible for monitoring air quality and publishing data in line with national NEPM standards. Most states and territories publish air quality indexes for individual monitoring locations, using a consistent linear scale where 100 represents the maximum concentration standard for each pollutant, as set by the NEPM.
Maximum concentration standards
| Pollutant | Averaging period | Maximum concentration standard |
|---|---|---|
| Carbon monoxide | 8 hours | 9 ppm |
| Nitrogen dioxide | 1 hour | 0.12 ppm |
| Ozone | 1 hour / 4 hours | 0.10 ppm / 0.08 ppm |
| Sulphur dioxide | 1 hour / 1 day / 1 year | 0.20 ppm / 0.08 ppm / 0.02 ppm |
| Lead | 1 year | 0.50 μg/m³ |
| PM 10 | 1 day / 1 year | 50 μg/m³ / 25 μg/m³ |
| PM 2.5 | 1 day / 1 year | 25 μg/m³ / 8 μg/m³ |
The air quality index (AQI) for a location is the highest of the index values for each pollutant being monitored there.
AQI bands
| AQI | Description | Health advice |
|---|---|---|
| 0–33 | Very Good | Enjoy activities |
| 34–66 | Good | Enjoy activities |
| 67–99 | Fair | People unusually sensitive to air pollution should plan strenuous outdoor activities for when air quality is better |
| 100–149 | Poor | Sensitive groups should cut back or reschedule strenuous outdoor activities |
| 150–200 | Very Poor | Sensitive groups should avoid strenuous outdoor activities; everyone should cut back or reschedule strenuous outdoor activities |
| 200+ | Hazardous | Sensitive groups should avoid all outdoor physical activity; everyone should significantly cut back on outdoor physical activity |
Monitoring air quality
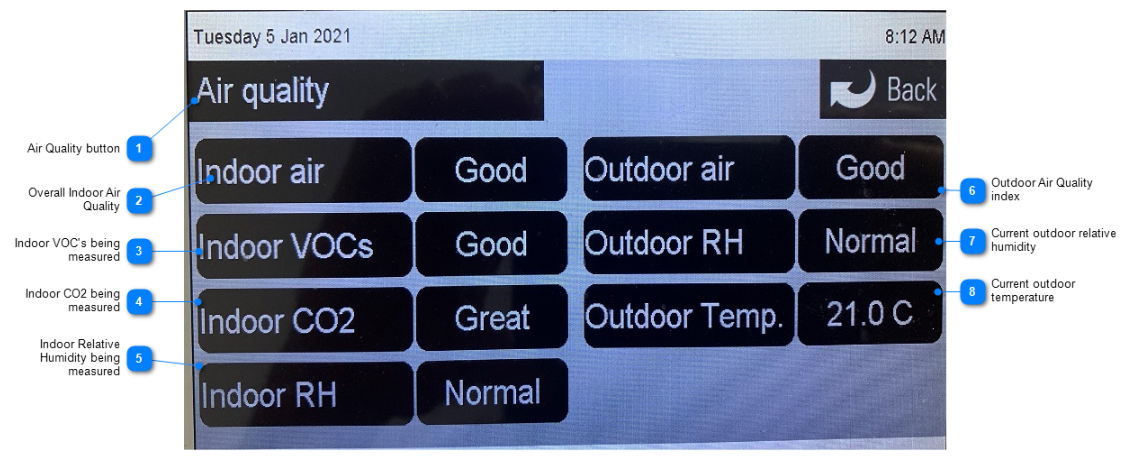
- Air Quality Button: Go to the "Monitoring" tab and press the Air Quality button to access air quality monitoring
- Overall Indoor Air Quality: Based on all the parameters being measured, this is a guide to the overall indoor air quality
- Indoor VOCs Being Measured: The level of VOCs being measured at the screen. Press the rating button (e.g. "Good") to see the actual reading in parts per billion and a guide to VOC levels
- Indoor CO2 Being Measured: The level of equivalent CO2 being measured at the screen. Press the rating button (e.g. "Great") to see the actual reading in parts per million and a guide to CO2 levels
- Indoor Relative Humidity Being Measured: The level of RH being measured at the screen, in percentage. Press the rating button (e.g. "Normal") to see the actual reading and a guide to RH levels Indoor Air Quality is only available on Nexus+
- Outdoor Air Quality Index: The outdoor AQI measured at the air quality station closest to your home. Press the rating button (e.g. "Good") to see the actual reading and a guide to AQI levels
- Current Outdoor Relative Humidity: The current outdoor relative humidity from the last reading received
- Current Outdoor Temperature: The current outdoor dry bulb temperature from the last reading received