Nexus Modern Operation Guide
AC system summary
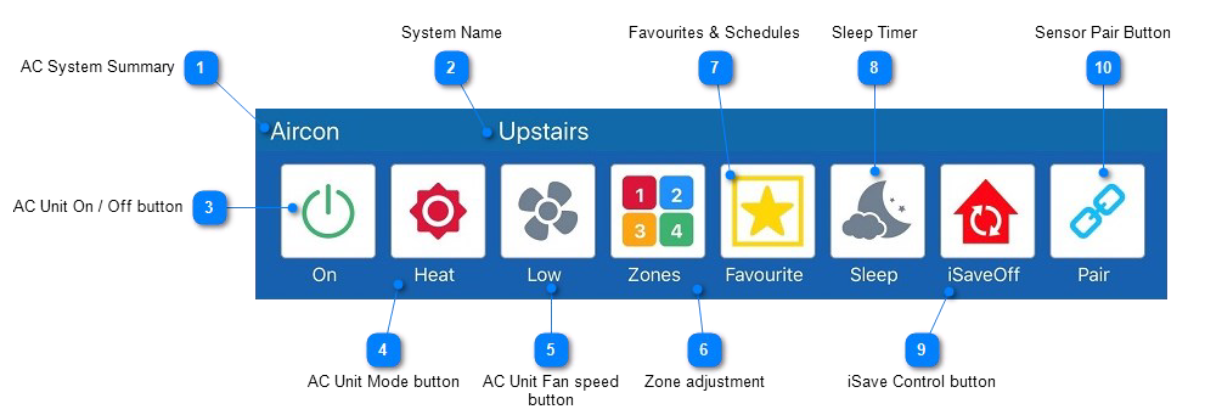
- AC System Summary: This is a typical Modern AC System Summary. If there is more than one AC system connected to this screen, it may display multiple AC system summaries. The different systems are identified by the system name
- System Name: The system name is displayed here. Press the name if you want to change it
- AC Unit On / Off Button: The AC unit can be turned on and off by pressing the On/Off button. When on, the button will be green and the text below will read "On". When off, the button will turn red and the text below will read "Off" Please note that all AC units incorporate built-in timers and delays, so it may take several minutes after turning a unit on or off before you notice any change
- AC Unit Mode Button: Press the Mode button to change from Cool > Heat > Dry > Vent > Auto. Pressing the Mode button opens the AC Unit Control screen
- AC Unit Fan Speed Button: Press the Fan button to change from High > Med > Low > Auto fan speeds. Pressing this button also opens the AC Unit Control screen
- Zone Adjustment: Press the Zones button to access the Zone Summary
- Favourites & Schedules: Press the Favourites button to access the Favourites and Schedule Summary
- Sleep Timer: Press the Sleep Timer button to toggle different durations, from half an hour to 12 hours. When set, the AC system will run for the selected period and then turn off automatically. If you require a more sophisticated schedule, go to Schedules
- iSave Control Button: If fitted, the iSave system can be manually turned on and off by pressing the iSave button. When turned on, the AC unit will automatically switch to Vent mode, the outside air dampers will open fully, and the return air dampers will close fully. The zones will control as per normal. When turned off, the AC unit will automatically return to its previous mode, the outside air dampers will close fully, and the return air dampers will open fully
- Sensor Pair Button: Use this pair button to pair devices to the iZone Aircon system, such as zone sensors and the bridge
AC unit control
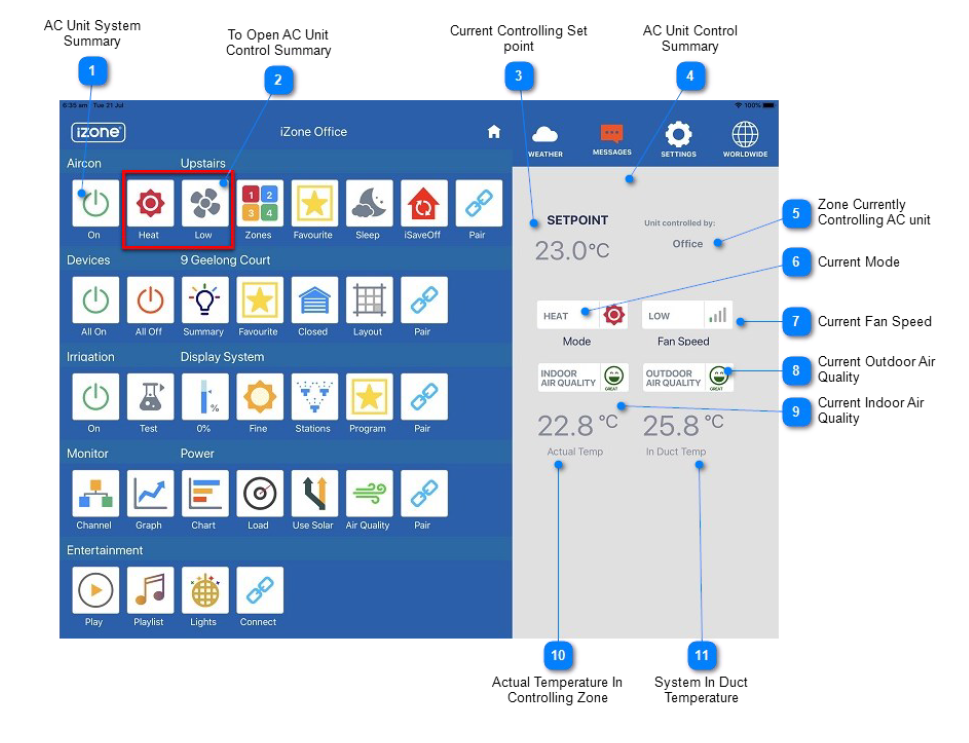
- AC Unit System Summary: This is the AC unit system summary
- To Open AC Unit Control Summary: Press either the Mode or Fan Speed button to open the AC Unit Control window
- Current Controlling Set Point: The current controlling set point is shown here. This view differs depending on how the AC unit's controlling sensor is configured. In this example, the AC unit is being controlled from "Zones", and the zone currently furthest from set point is the Office
- AC Unit Control Summary: This is the AC Unit control summary
- Zone Currently Controlling AC Unit: The name of the zone currently controlling the AC unit
- Current Mode: The current mode is displayed here. Press the mode button to change
- Current Fan Speed: The current fan speed is displayed here. Press the fan button to change
- Current Outdoor Air Quality: A summary of the current outdoor air quality is displayed here. Press the Outdoor button for details
- Current Indoor Air Quality: A summary of the current indoor air quality is displayed here. Press the Indoor button for details Only available on Nexus+ controllers
- Actual Temperature in Controlling Zone: The actual temperature in the controlling zone is displayed here
- System In-Duct Temperature: The temperature of the air in the supply air duct is displayed here This is only displayed if a CDTS has been fitted to the system
Zone summary
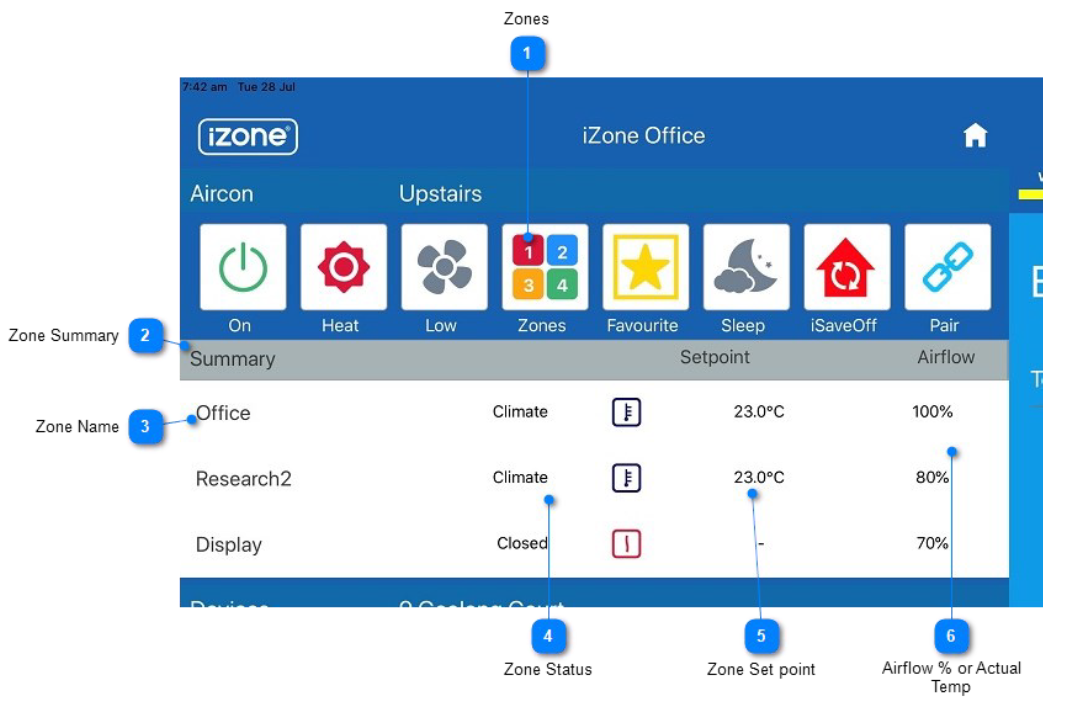
- Zones: Press the "Zones" icon to open the zone summary below. Press it again and the summary will collapse
- Zone Summary: Zones are listed here. Press on a zone's set point or airflow to open the zone details
- Zone Name: The zone names are listed here
- Zone Status: The current status of the zone is described here. Pressing the status toggles it from Open > Closed > Climate Climate is only applicable to zones that are set up for temperature control
- Zone Set Point: Zones configured for temperature control display their current set point here. Press this temperature to access the zone details and make changes
- Airflow % or Actual Temp: The airflow % or actual temperature for the zone is displayed here. Press this value to access the zone details and make changes
Open / Close operation
The most basic operation of the zones is the open/close function. As the name implies, when a zone is opened it drives open to its maximum (MAX) open position. When a zone is closed, it drives to its minimum (MIN) closed position.
If MAX is set to 70%, the damper will not fully open, stopping 30% of the airflow to the zoned area. If MIN is set to 20%, the damper will not fully close, leaving the zone to continue receiving 20% airflow.
Climate control operation
Zone temperature control requires the respective zones to be set to "Climate" and uses the iZone temperature sensors to modulate the zone dampers to maintain the zone set point.
If you have multiple zones with temperature sensors, you can have a variation of temperatures throughout the home, and the iZone system will communicate with all zones, making adjustments automatically to maintain the desired set points in all zoned areas.
Zone details
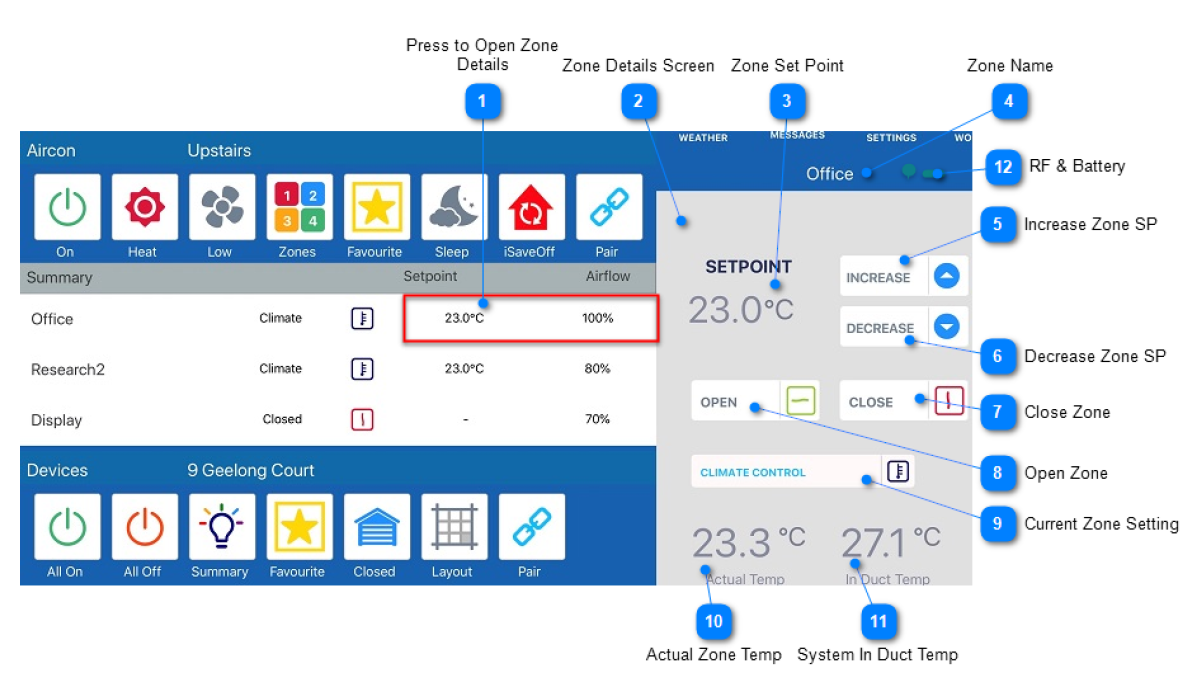
- Press to Open Zone Details: Press on the zone's set point or airflow to open the details for that zone
- Zone Details Screen: This is the Zone Details screen
- Zone Set Point: This is the zone set point (if fitted with a temperature sensor)
- Zone Name: The zone name appears at the top of the Zone Details screen
- Increase Zone Set Point: To increase the zone set point, press the up arrow
- Decrease Zone Set Point: To decrease the zone set point, press the down arrow
- Close Zone: To close the zone, touch the Close button
- Open Zone: To open the zone, touch the Open button
- Current Zone Setting: The text of the current zone setting is displayed in blue font To set a zone to Climate (temperature) control, touch the Climate Control button
- Actual Zone Temp: The current temperature in the zone is displayed here This depends on configuration settings and requires an in-duct temperature sensor to be installed in this zone
- System In Duct Temp: The current system supply air temperature is displayed here This requires a CDTS temperature sensor to be installed in the main supply air duct
- RF & Battery: The signal strength and battery capacity of the wireless sensor are displayed here
Airflow summary
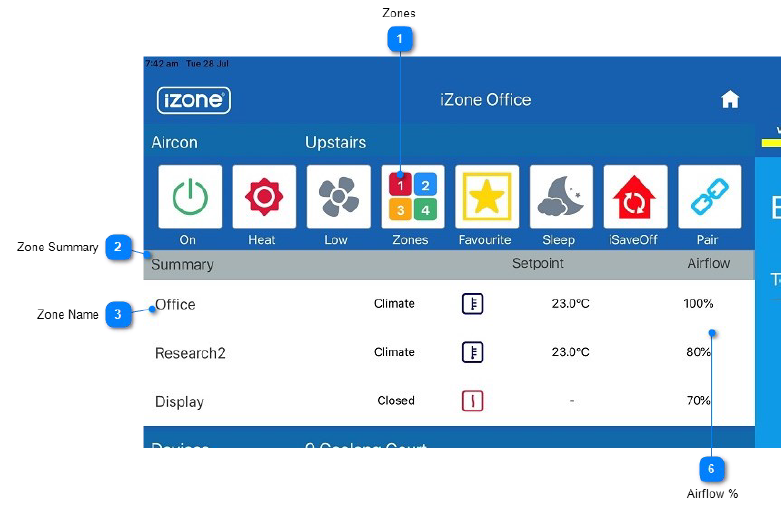
- Zones: When the "Zones" icon is pressed, it will open the zone summary below. Press the Zones icon again and the summary will collapse
- Zone Summary: Zones are listed here. Press on the Airflow to open the Airflow details for this zone
- Zone Name: The zone names are listed here. To change the name, follow this link
- Airflow %: The % airflow or actual temperature for the zone is displayed here. Press this % to access the zone details and make changes
Airflow details
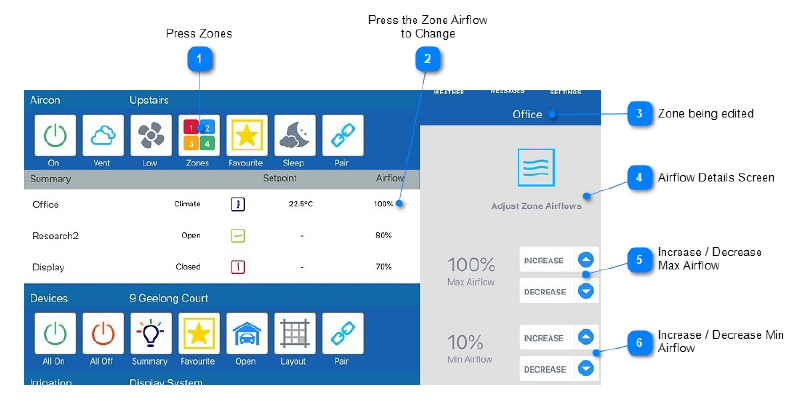
- Press Zones: Press the Zones icon to open the zone summary
- Press the Zone Airflow to Change: Press on the Zone Airflow to open the Airflow details for this zone
- Zone Being Edited: The zone name appears at the top of the Airflow Details screen
- Airflow Details Screen: This is the Zone Airflow Details screen
- Increase / Decrease Max Airflow: Use the up and down arrows to edit the maximum airflow % for this zone. If these arrows aren't visible, airflow adjustment may have been locked
- Increase / Decrease Min Airflow: Use the up and down arrows to edit the minimum airflow % for this zone. If these arrows aren't visible, airflow adjustment may have been locked
Favourites & scheduling summary
A favourite is a shortcut that allows the user to press a single button to simultaneously change zone status, set points, mode, and fan speed.
Once a favourite has been created, it can then be scheduled to start and stop at specific times during a 7-day week.
To configure a schedule, first create a favourite with the mode, fan speed, and zone settings you want to run when the schedule is active. Once the favourite has been created and tested, it can then be scheduled to start and/or stop at the required time.
Note: if schedules overlap, the following occurs — Schedule A starts at 08:00 and stops early at 08:45 because it is overridden by Schedule B. Schedule B starts at 08:45 and stops early at 09:15 because it is overridden by Schedule C. Schedule C starts and stops at its scheduled times of 09:15–10:40.
Favourites summary
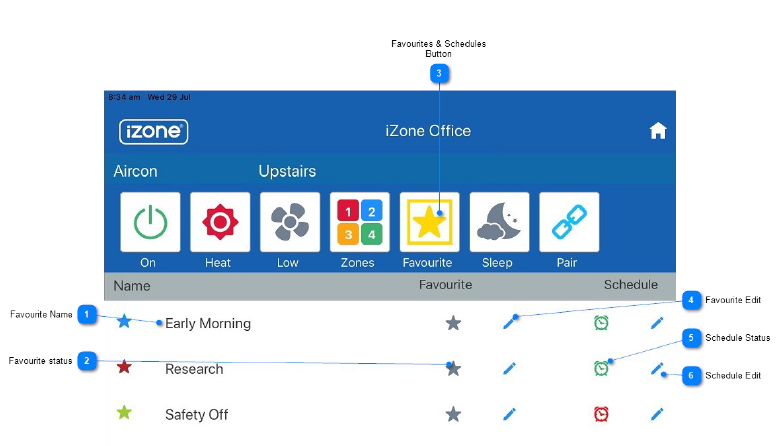
- Favourite Name: The name of the favourite is displayed here — it's useful to name it something that indicates what the favourite does. To edit the name, use the edit pencil to access the details of the favourite
- Favourite Status: To manually activate this favourite, just press the star
- Favourites & Schedules Button: Press this button on the AC System Summary to open the Favourites and Schedules
- Favourite Edit: Press the edit pencil to open the details screen for a favourite
- Schedule Status: The green clock indicates this schedule is active and will start/stop the favourite on the scheduled days/times. To deactivate this schedule, press the clock and it will change to red, indicating the schedule has been paused
- Schedule Edit: Press the edit pencil to open the schedule details screen for this favourite
Favourites details
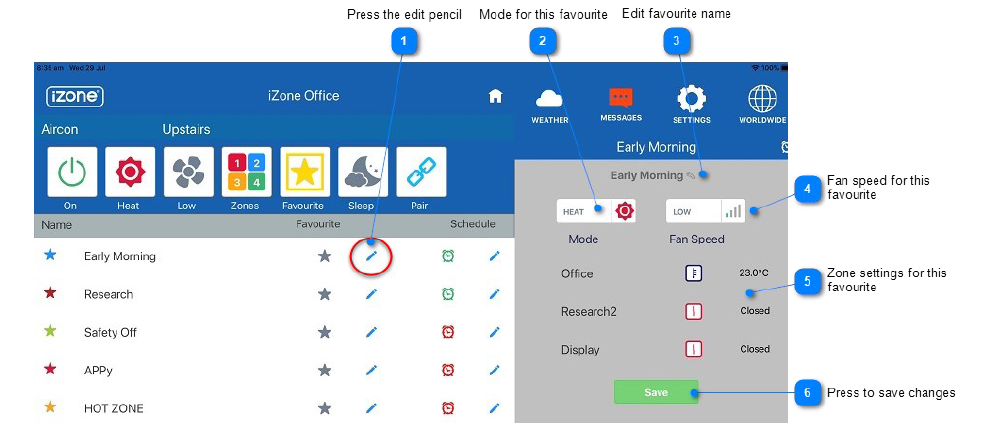
- Press the Edit Pencil: Press the edit pencil to open the details screen for a favourite
- Mode for this Favourite: This is the current mode for this favourite. Press this button to toggle through the different modes If N/A is selected, the iZone system will not change the mode when this favourite is activated
- Edit Favourite Name: Press the name of the favourite to change it
- Fan Speed for this Favourite: This is the current fan speed for this favourite. Press this button to toggle through the different fan speeds If N/A is selected, iZone will not change the fan speed when this favourite is activated
- Zone Settings for this Favourite: These are the current zone settings for this favourite. Press a setting to change it — you can toggle from Closed > Open > Climate. To change the set point temperature on a Climate Controlled zone, go to "Zones" and change the corresponding zone set point temperatures, then return to Favourites and save
- Press to Save Changes: Once you're happy with all your changes, press the Save button
Scheduling summary
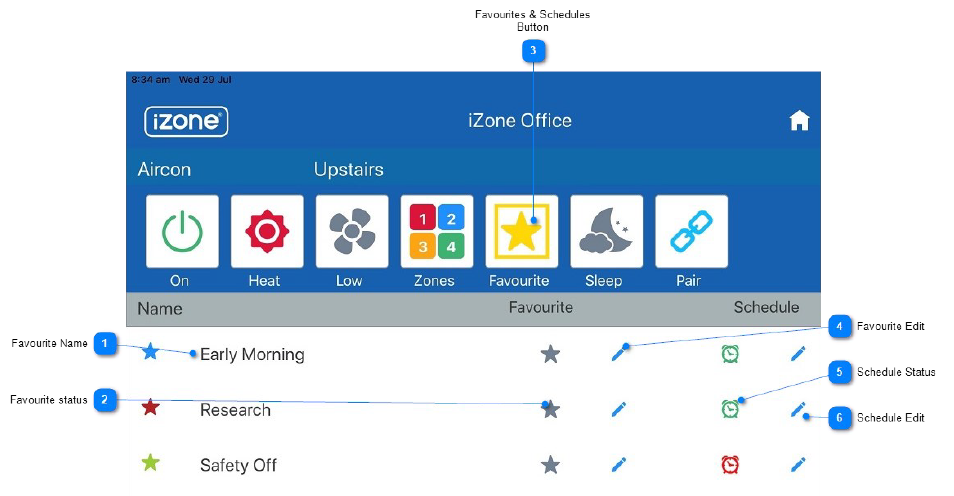
- Favourite Name: The name of the favourite is displayed here — it's useful to name it something that indicates what the favourite does. To edit the name, use the edit pencil to access the details of the favourite
- Favourite Status: To manually activate this favourite, just press the star
- Favourites & Schedules Button: Press this button on the AC System Summary to open the Favourites and Schedules
- Favourite Edit: Press the edit pencil to open the details screen for a favourite
- Schedule Status: The green clock indicates this schedule is active and will start/stop the favourite on the scheduled days/times. To deactivate this schedule, press the clock and it will change to red, indicating the schedule has been paused
- Schedule Edit: Press the edit pencil to open the schedule details screen for this favourite
Scheduling details
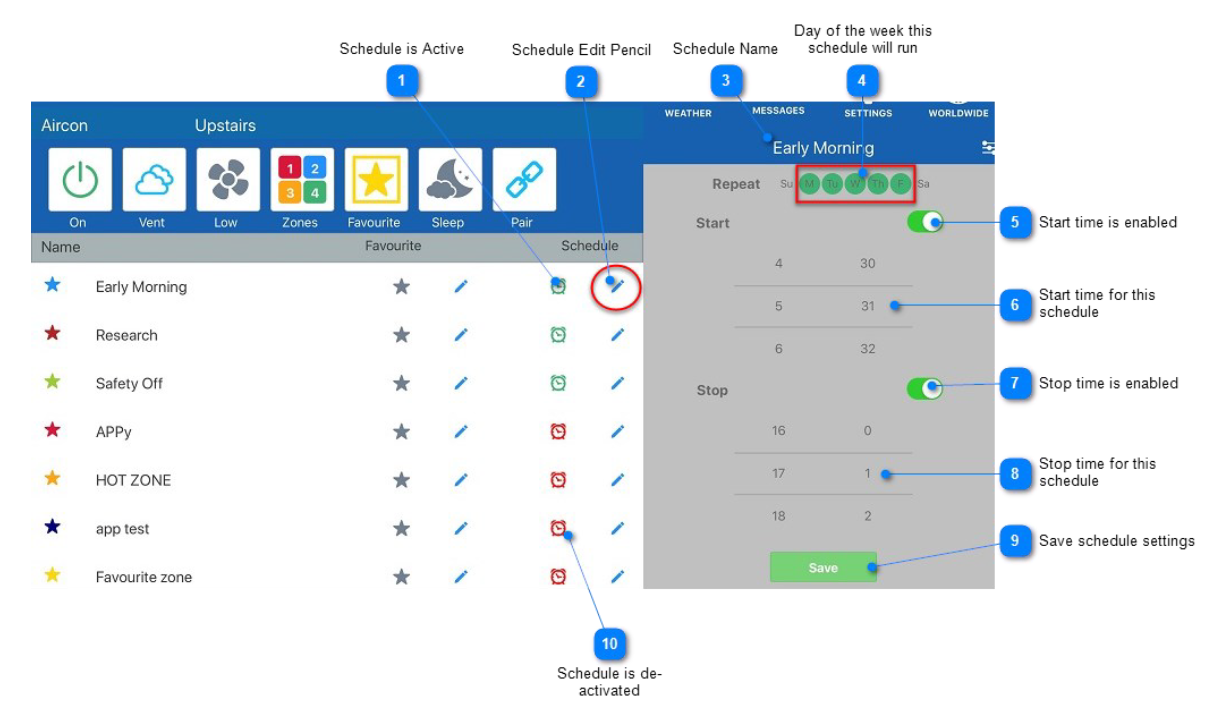
- Schedule is Active: When the clock is green, the schedule is active and will run on the required days and times. Press the icon to deactivate this schedule
- Schedule Edit Pencil: Press the edit pencil to open the details screen for a schedule
- Schedule Name: This uses the name of the favourite you are scheduling to run. To change the name, go to Favourites and change the name of the favourite
- Day of the Week this Schedule will Run: Days the schedule will run are shown in a green circle. To change the days, press the day you want to change
- Start Time is Enabled: For a standard schedule you would normally enable both the start and stop times. However, it's possible for a schedule to have only a stop time and no start time — for example, in a commercial business where staff start the AC system manually to save running costs when the weather is mild, but want it to turn off automatically overnight
- Start Time for this Schedule: This is the time this schedule will start. Adjust the hours and minutes to suit your requirements Please note it is a 24-hour clock
- Stop Time is Enabled: For a standard schedule you would normally enable both the start and stop times. However, it's possible for a schedule to have only a start time and no stop time — for example, where the system turns on automatically in the morning but only turns off when the security system is activated once all staff have left the building (additional hardware may be required)
- Stop Time for this Schedule: This is the time this schedule will stop. Adjust the hours and minutes to suit your requirements
- Save Schedule Settings: Once you're happy with all your changes, press the Save button
- Schedule is De-activated: When the clock is red, the schedule is deactivated and will not run. Press the icon to activate this schedule
Monitoring air quality
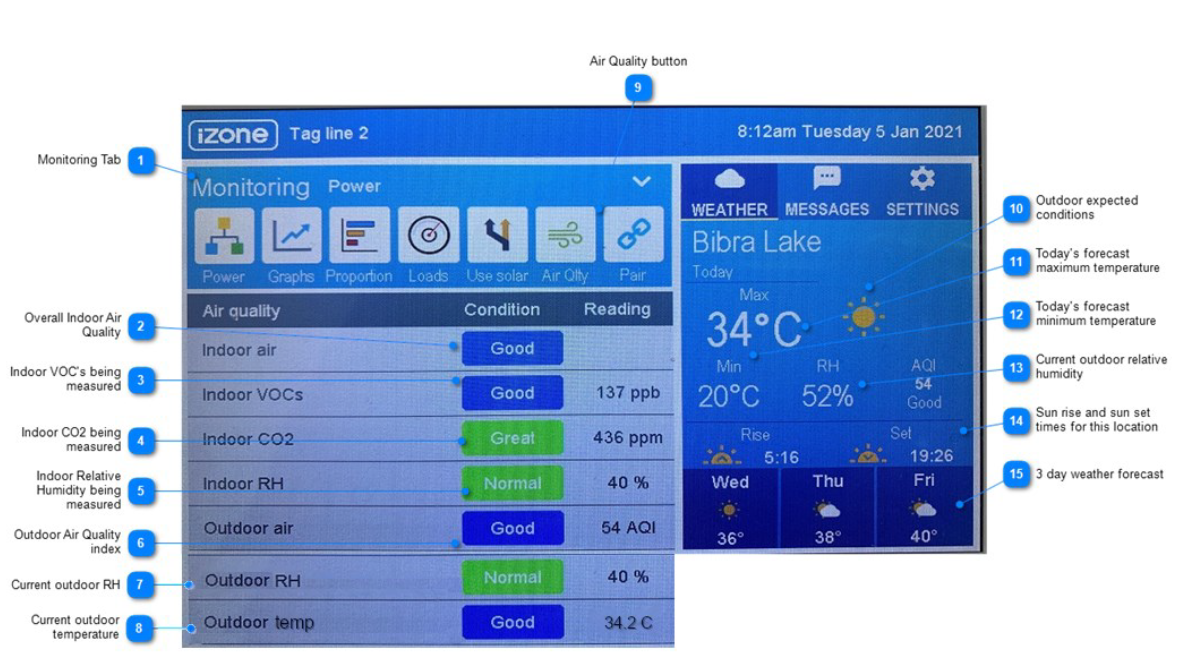
- Monitoring Tab: Scroll down to the monitoring tab on the home screen
- Overall Indoor Air Quality: Based on all the parameters being measured, this is a guide to the overall indoor air quality
- Indoor VOCs Being Measured: The level of VOCs being measured at the screen, in parts per billion. Press the rating button (e.g. "Good") for a guide to VOC levels
- Indoor CO2 Being Measured: The level of equivalent CO2 being measured at the screen, in parts per million. Press the rating button (e.g. "Great") for a guide to CO2 levels
- Indoor Relative Humidity Being Measured: The level of RH being measured at the screen, in percentage. Press the rating button (e.g. "Normal") for a guide to RH levels
- Outdoor Air Quality Index: The outdoor AQI measured at the air quality station closest to your home. Press the rating button (e.g. "Good") for a guide to AQI levels
- Current Outdoor RH: Scroll down to view the current outdoor relative humidity
- Current Outdoor Temperature: Scroll down to view the current outdoor dry bulb temperature
- Air Quality Button: Press the Air Quality button to access the air quality monitoring
- Outdoor Expected Conditions: Today's expected outdoor conditions
- Today's Forecast Maximum Temperature: Today's expected maximum outdoor dry bulb temperature in degrees Celsius
- Today's Forecast Minimum Temperature: Today's expected minimum outdoor dry bulb temperature in degrees Celsius
- Current Outdoor Relative Humidity: The current outdoor relative humidity from the last reading received
- Sunrise and Sunset Times for this Location: Today's sunrise and sunset times for the location used on this screen
- 3 Day Weather Forecast: The three-day weather forecast for the location used on this screen